Decals
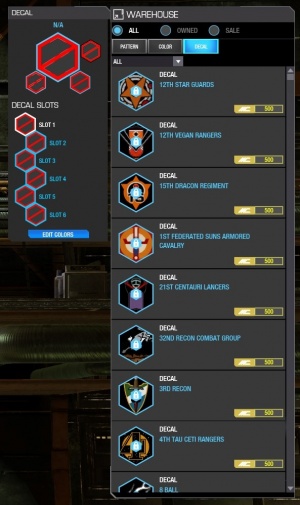
There are hundreds of decals available to customize your 'Mech. From the "Camo Spec" button in the MechLab select the "Decal" button. The defaulted "All" button shows all decals available for the selected 'Mech. The "Owned" button shows all decals owned for the selected 'Mech. The "Sale" button shows all decals on sale. The drop menu filters the decals on display, and defaults to "New", showing decals availing new with the current patch.
There are three ‘classes’ of Decal:
- Basic (180 MC)
- Special (500 MC)
- Premium (1250 MC)
All Decals are single-purchase unlockable items; once purchased they can be applied to as many ‘Mechs as you wish as often as you wish.
Due the customization options inherent with any layered Decal system, the use of Decals is subject to adherence to the Code of Conduct. Violations of the Code of Conduct through the inappropriate use of Decals are subject to moderation.
Placing Decals
Each 'Mech has nine available Decal Slots, all of which are available for use from the outset. Decals can be layered over each other to create distinctive arrangements and patterns. Slot 1 is the top Decal layer, and layering priority descends from that order. Slot 1 Decals will appear over Slots 2-6, Slot 2 over Slots 3-6, and so on.
When an Empty Slot is selected and a Decal is chosen from the Warehouse you will immediately enter 'Edit Mode'. From here you can scale, rotate, apply the Decal, or cancel out of Edit Mode. When hovering over areas of a 'Mech where Decals cannot be placed the Decal you are applying will be replaced with an Invalid symbol. When the area is valid, the Decal will appear as normal. If you find your intended placement is invalid you may need to decrease the scale of the Decal. In other cases, that portion of 'Mech geometry may not support the placement of Decals. Once you're satisfied with your Decal simply double-click your mouse to commit its placement. Once a Decal placement is committed you will automatically exit Edit Mode. You can see a demonstration of how the Decal system works.
- Edit Mode Controls
- Mouse Wheel Up/Down: Scale Up/Down
- A: Rotate Left
- D: Rotate Right
- Escape: Cancel Edit Mode
- F: Flip
Modifying a Placed Decal
Once a Decal has been placed it can be edited, removed, or changed to another Decal.
To edit a placed Decal simply click the Edit button for that Slot. This will place you into Edit Mode for your chosen Decal.
To swap an already placed Decal with another, simply choose the Decal Slot you wish to change and select another Decal from the Warehouse. This will apply the new Decal to that Slot with same scale, rotation, position, and orientation of the original. This is a quick and easy way to see what other Decals look like in an occupied Decal Slot without requiring you to manually add the Decal through Edit Mod.
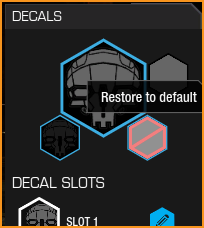
To remove a Decal, simply select the Decal Slot and click the 'Restore to Default' hex underneath the main Decal hex.
Decal Colors
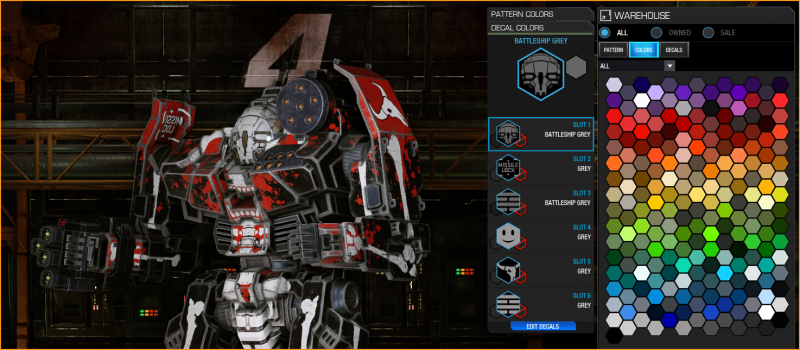
Decals utilize the same Color system as Patterns. Any Colors you already own, or any Colors you purchase, are applicable to both Patterns and Decals. To apply a color to a Decal simply click the 'Edit Colors' button inside the Decals window. From there you can preview and apply Colors for your Decals.
The majority of Decals are 'colorable'; their default Color can be changed using the standard Color swatches. Certain Decals, such as Faction Decals and Unit Decals, are color-locked. Their Colors cannot be modified.


