Difference between revisions of "Mech Lab"
| Line 1: | Line 1: | ||
| − | The "MechLab" is where you build your 'Mech. | + | The "MechLab" is where you build your 'Mech. The figure below shows a fully stripped Atlas AS7-D-DC. You will seldom see BattleMechs so empty, but it's a good place to start. Because this interface must work on many different monitors and resolutions, the Mech Bay is very modular. The below images were taken on a 1920 x 1080 display. |
= MechLab = | = MechLab = | ||
| − | [[File: | + | [[File:MechLab_AS7_3.jpg | border | 1000px | Figure 1]] |
| − | <span class="hilight-word">1. 'Mech Layout</span> - The 'Mech is displayed as a schematic with every location's slots available for use. | + | <span class="hilight-word">1. 'Mech Layout</span> - The 'Mech is displayed as a schematic with every location's slots available for use. Fixed components are shown in grey - they cannot be removed. "Empty Slots" are available for components. We will build or Atlas below. |
| − | <span class="hilight-word">2. Warehouse</span> - | + | <span class="hilight-word">2. Warehouse</span> - All components that can be installed on the 'Mech are shown here. The contents of each tab will dynamically change depending on the hardpoints. If you install components that you do not currently own you will be charged when to select "Save". |
| − | <span class="hilight-word">3. Side Menu</span> - | + | <span class="hilight-word">3. Side Menu</span> - MechLab screen sub-menus. Details below. |
| − | <span class="hilight-word">4. 'Mech Stats</span> - | + | <span class="hilight-word">4. 'Mech Stats</span> - Dynamic listing of 'Mech information, updated as components are added. Also has buttons to strip your 'Mech, reset any un-saved changes, and take the currently configured 'Mech (even if not yet saved) into the Testing Grounds. |
<span class="hilight-word">5. Build Warnings</span> - | <span class="hilight-word">5. Build Warnings</span> - | ||
| + | |||
| + | <span class="hilight-word">6. 'Mech Upgrades</span> - | ||
Revision as of 03:57, 20 October 2018
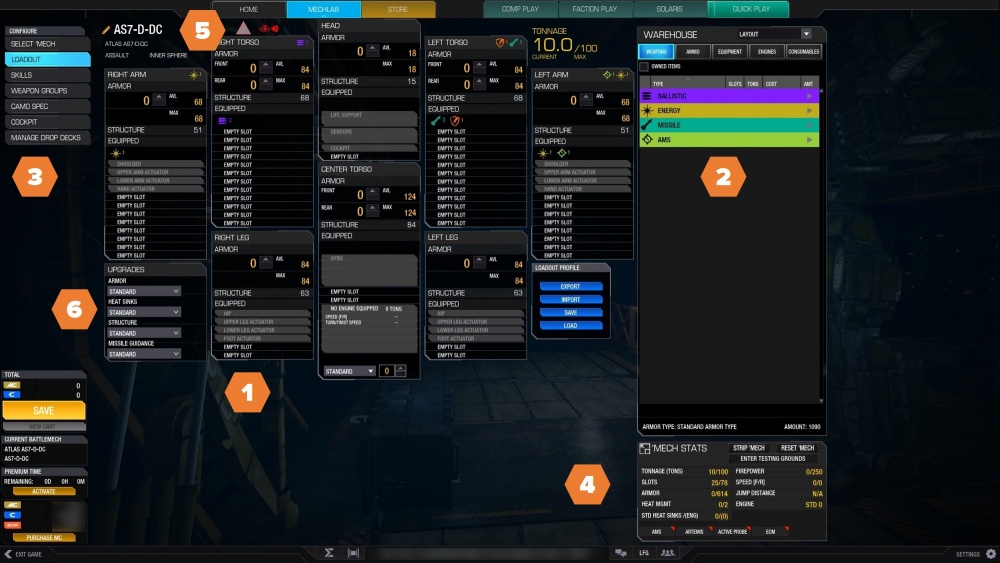
The "MechLab" is where you build your 'Mech. The figure below shows a fully stripped Atlas AS7-D-DC. You will seldom see BattleMechs so empty, but it's a good place to start. Because this interface must work on many different monitors and resolutions, the Mech Bay is very modular. The below images were taken on a 1920 x 1080 display.
MechLab
1. 'Mech Layout - The 'Mech is displayed as a schematic with every location's slots available for use. Fixed components are shown in grey - they cannot be removed. "Empty Slots" are available for components. We will build or Atlas below.
2. Warehouse - All components that can be installed on the 'Mech are shown here. The contents of each tab will dynamically change depending on the hardpoints. If you install components that you do not currently own you will be charged when to select "Save".
3. Side Menu - MechLab screen sub-menus. Details below.
4. 'Mech Stats - Dynamic listing of 'Mech information, updated as components are added. Also has buttons to strip your 'Mech, reset any un-saved changes, and take the currently configured 'Mech (even if not yet saved) into the Testing Grounds.
5. Build Warnings -
6. 'Mech Upgrades -
